How to Add GraphQL to Your Next.js App
GraphQL is a query language for your API. It's a more flexible and efficient way to communicate with services. A graph can be used to describe your API and the data it will need. Adopting GraphQL over traditional REST APIs is a competitive advantage that many startups have utilized since it was open-sourced in 2015. This advantage has allowed startups to quickly innovate and build products. In this blog we will be learning how to add GraphQL to your Next.js App.

Jordan Wu
6 min·Posted

Table of Contents
What is GraphQL?
GraphQL is a query language for your API. It was created by engineers at Facebook to help solve the issue of maintaining REST APIs. The issue with REST APIs was it's lack of flexibility in terms of data fetching, issues like over-fetching and under-fetching data were very common in the development lifecycle. This impacted the speed and performance of the company. GraphQL was created to improve the development lifecycle by including a graph to express the API. Doing so allows the API to be flexible and create a declarative way to represent the data you need.
How to Add GraphQL to Next.js App Router
This blog is based on How to Add Prisma Postgres Database Adapter to Your Next.js App and will be using Prisma as our ORM. There are many ways to add GraphQL with Prisma and this will be one approach using Pothos GraphQL.
What Set Pothos Apart
- Leverage typescript for best-in-class type-safety
- A clear separation between the shape of your external GraphQL API, and the internal representation of your data.
- A large plugin ecosystem that provides a wide variety of features while maintaining great interoperability between plugins.
- Has been designed to work at every scale from small prototypes to huge Enterprise applications, and is in use at some of the largest tech companies including Airbnb and Netflix.
Setup
Install the following dependencies:
pnpm add @pothos/core @pothos/plugin-errors @pothos/plugin-prisma graphql graphql-scalars graphql-yoga
Once you have the dependencies installed. The next step is to update our Prisma configuration to generate our Pothos TypeScript types based on our Prisma types. Make the following changes to schema.prisma.
// This is your Prisma schema file,
// learn more about it in the docs: https://pris.ly/d/prisma-schema

// Looking for ways to speed up your queries, or scale easily with your serverless or edge functions?
// Try Prisma Accelerate: https://pris.ly/cli/accelerate-init

generator client {
  provider        = "prisma-client-js"
  previewFeatures = ["driverAdapters"]
}

generator pothos {
  provider = "prisma-pothos-types"
  output   = "./pothos-types.ts"
}

datasource db {
  provider = "postgresql"
  url      = env("DATABASE_URL")
}

model User {
  uuid  String @id @default(uuid())
  email String @unique

  createdAt DateTime @default(now()) @map("created_at")
  updatedAt DateTime @updatedAt @map("update_at")

  @@map("users")
}
This will define a generator for Pothos using prisma-pothos-types and outputting the types into pothos-types.ts. Be sure to include this generator command in your Next.js build script inside of package.json.
"build": "npx prisma generate && next build",
You would want to include @types/graphql and @types/pg dev dependencies for better type-safety.
File Structure
Now you have TypeScript types for Pothos for type-safety. This setup will be focused on storing user's email address. It's time to create our GraphQL endpoint and the file structure will be the following:
|-- app
|   |-- api
|   |   |-- graphql
|   |   |   |-- resolvers
|   |   |   |   |-- user.ts
|   |   |   |-- builder.ts
|   |   |   |-- route.ts
|   |   |   |-- schema.ts
With this file structure our GraphQL endpoint would be /api/graphql and everything related to our GraphQl will be encapsulated in the graphql folder. In other words everything related to GraphQL will be in that folder.
Create Pothos Builder
The first step to using Pothos is to create builder.ts.
import SchemaBuilder from '@pothos/core'
import { PrismaClient } from '@prisma/client'
import PrismaPlugin from '@pothos/plugin-prisma'
import ErrorsPlugin from '@pothos/plugin-errors'

import type PrismaTypes from '@/prisma/pothos-types'

export const prisma = new PrismaClient({})

export const builder = new SchemaBuilder<{
  PrismaTypes: PrismaTypes
}>({
  plugins: [PrismaPlugin, ErrorsPlugin],
  prisma: {
    client: prisma,
  },
  errorOptions: {
    defaultTypes: [Error],
    defaultResultOptions: {
      name: ({ fieldName }) => fieldName,
    },
  },
})

builder.queryType({})

builder.mutationType({})

const ErrorInterface = builder.interfaceRef<Error>('ErrorInterface').implement({
  fields: (t) => ({
    message: t.exposeString('message'),
  }),
})

builder.objectType(Error, {
  name: 'Error',
  interfaces: [ErrorInterface],
})
In this file we will be creating our Prisma database client that will be used in the Pothos builder. The builder will be using both PrismaPlugin for better integration with Prisma and ErrorsPlugin for error handling. It will be exporting both prisma and builder to be used in other files.
Create User Resolver
Next create a resolver file named user.ts.
import { builder, prisma } from '../builder'

builder.prismaObject('User', {
  fields: (t) => ({
    uuid: t.exposeID('uuid'),
    email: t.exposeString('email'),
  }),
})

builder.queryField('user', (t) =>
  t.prismaField({
    type: 'User',
    args: {
      uuid: t.arg.string({ required: true }),
    },
    nullable: true,
    resolve: async (query, _parent, args, _info) => {
      return prisma.user.findUnique({
        ...query,
        where: { uuid: args.uuid },
      })
    },
  })
)

builder.mutationField('subscribeUserEmail', (t) =>
  t.prismaField({
    type: 'User',
    errors: {},
    args: {
      email: t.arg.string({ required: true }),
    },
    resolve: async (query, _parent, args, _info) => {
      const regex = /^[a-zA-Z0-9._%+-]+@[a-zA-Z0-9.-]+\.[a-zA-Z]{2,}$/

      const validateEmail = (email: string) => {
        return regex.test(email)
      }

      if (!validateEmail(args.email)) {
        throw new Error('Invalid email address')
      }

      try {
        return await prisma.user.create({
          ...query,
          data: {
            email: args.email,
          },
        })
      } catch (e) {
        throw new Error('You are already subscribed!')
      }
    },
  })
)
This User resolver file will be responsible for all User queries and mutations along with defining the User object.
- The User object has
uuidandemailboth fields are in the Prisma User model. - Next, it defines a user query called
userthat fetches one user from our Prisma database that is connected to Postgres byuuid. - Lastly, it defines a mutation query called
subscribeUserEmailthat will add a user record to ouruserstable. It first validates if the user's email is valid and then adds the user to the table. If the user already exists it will return an error.
Create Posthos Schema
Now you would need to create schema.ts, the GraphQL schema using the builder and the user resolver.
import { builder } from './builder'

import './resolvers/user'

export const schema = builder.toSchema()
Create GraphQL Endpoint
Create route.ts for our GraphQL endpoint.
import { createYoga } from 'graphql-yoga'
import { schema } from './schema'

import type { NextApiRequest, NextApiResponse } from 'next'

const { handleRequest } = createYoga<{
  req: NextApiRequest
  res: NextApiResponse
}>({
  schema,
  graphqlEndpoint: '/api/graphql',
  fetchAPI: { Response },
})

export { handleRequest as GET, handleRequest as POST, handleRequest as OPTIONS }
This will define our GraphQL schema and expose it to the endpoint. That's everything you would need to setup GraphQL in your Next.js app!
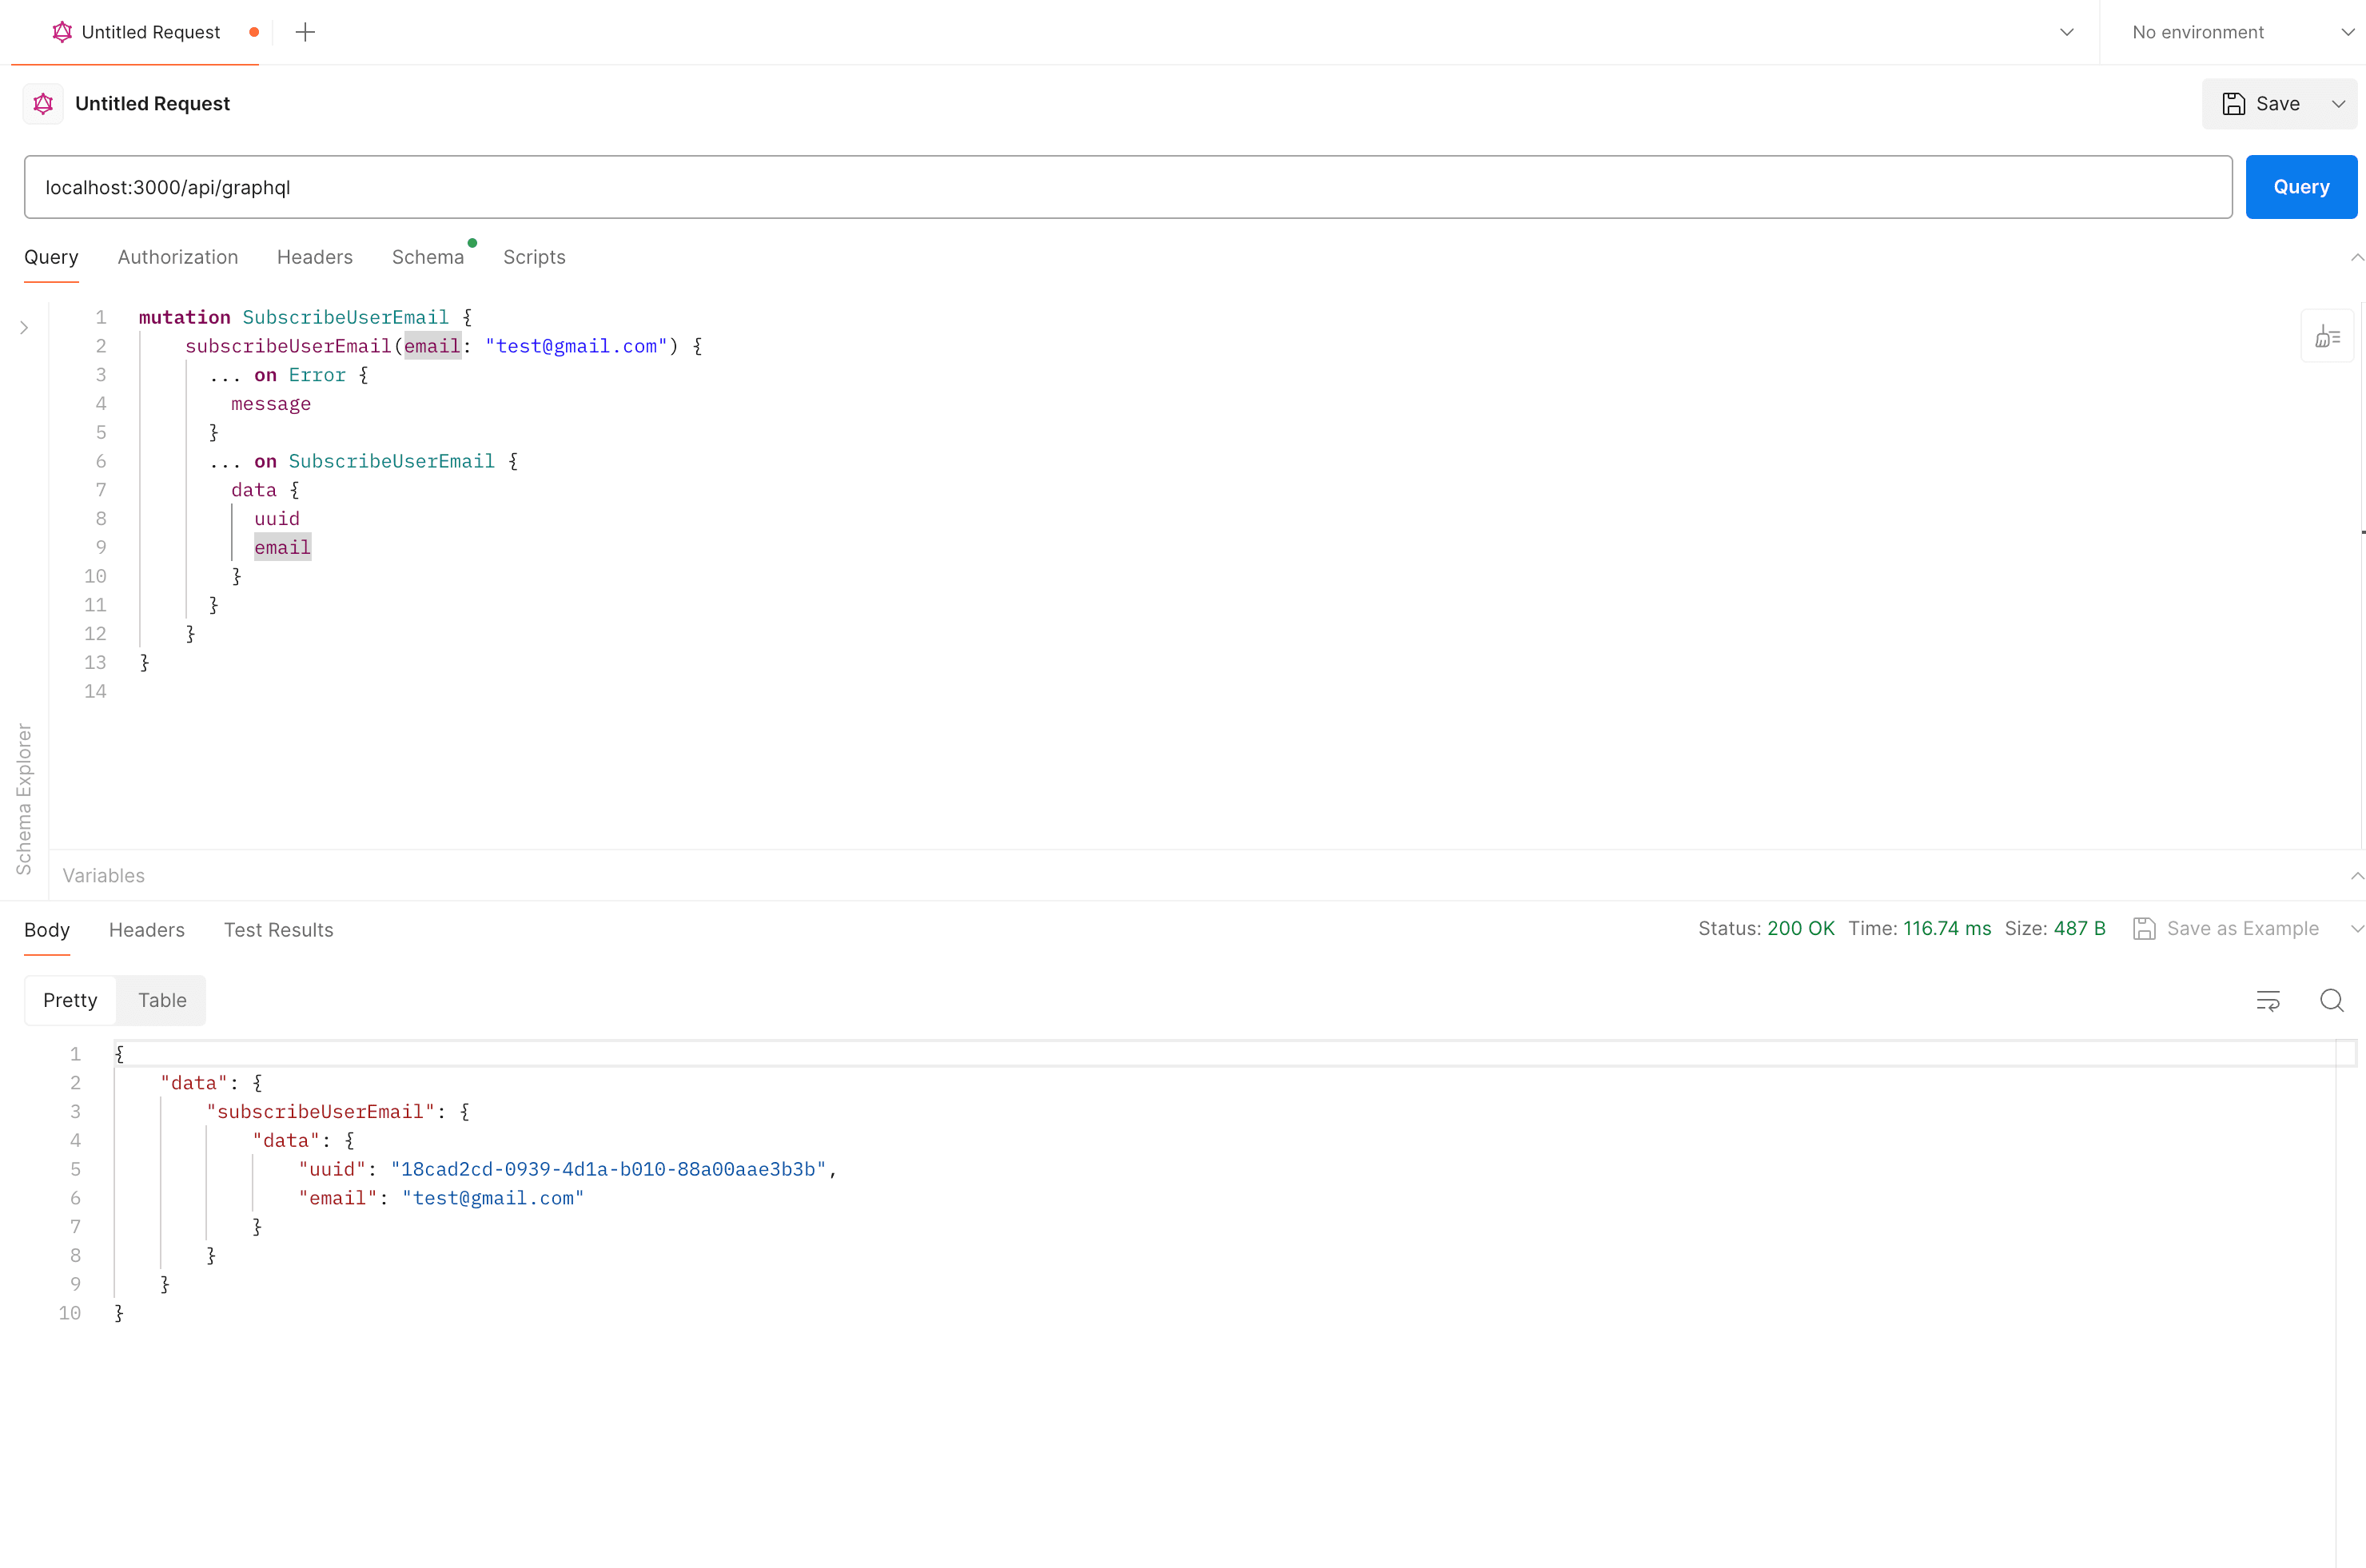
Testing With Postman
You can test the API with Postman or any other tools used for API testing. To test locally you would want to make a POST HTTPS request to localhost:3000/api/graphql and first would want to called the mutation query subscribeUserEmail to add a user to your users database table.
mutation SubscribeUserEmail {
    subscribeUserEmail(email: "test@gmail.com") {
      ... on Error {
        message
      }
      ... on SubscribeUserEmail {
        data {
          email
        }
      }
    }
}
output:
{
    "data": {
        "subscribeUserEmail": {
            "data": {
                "email": "test@gmail.com"
            }
        }
    }
}
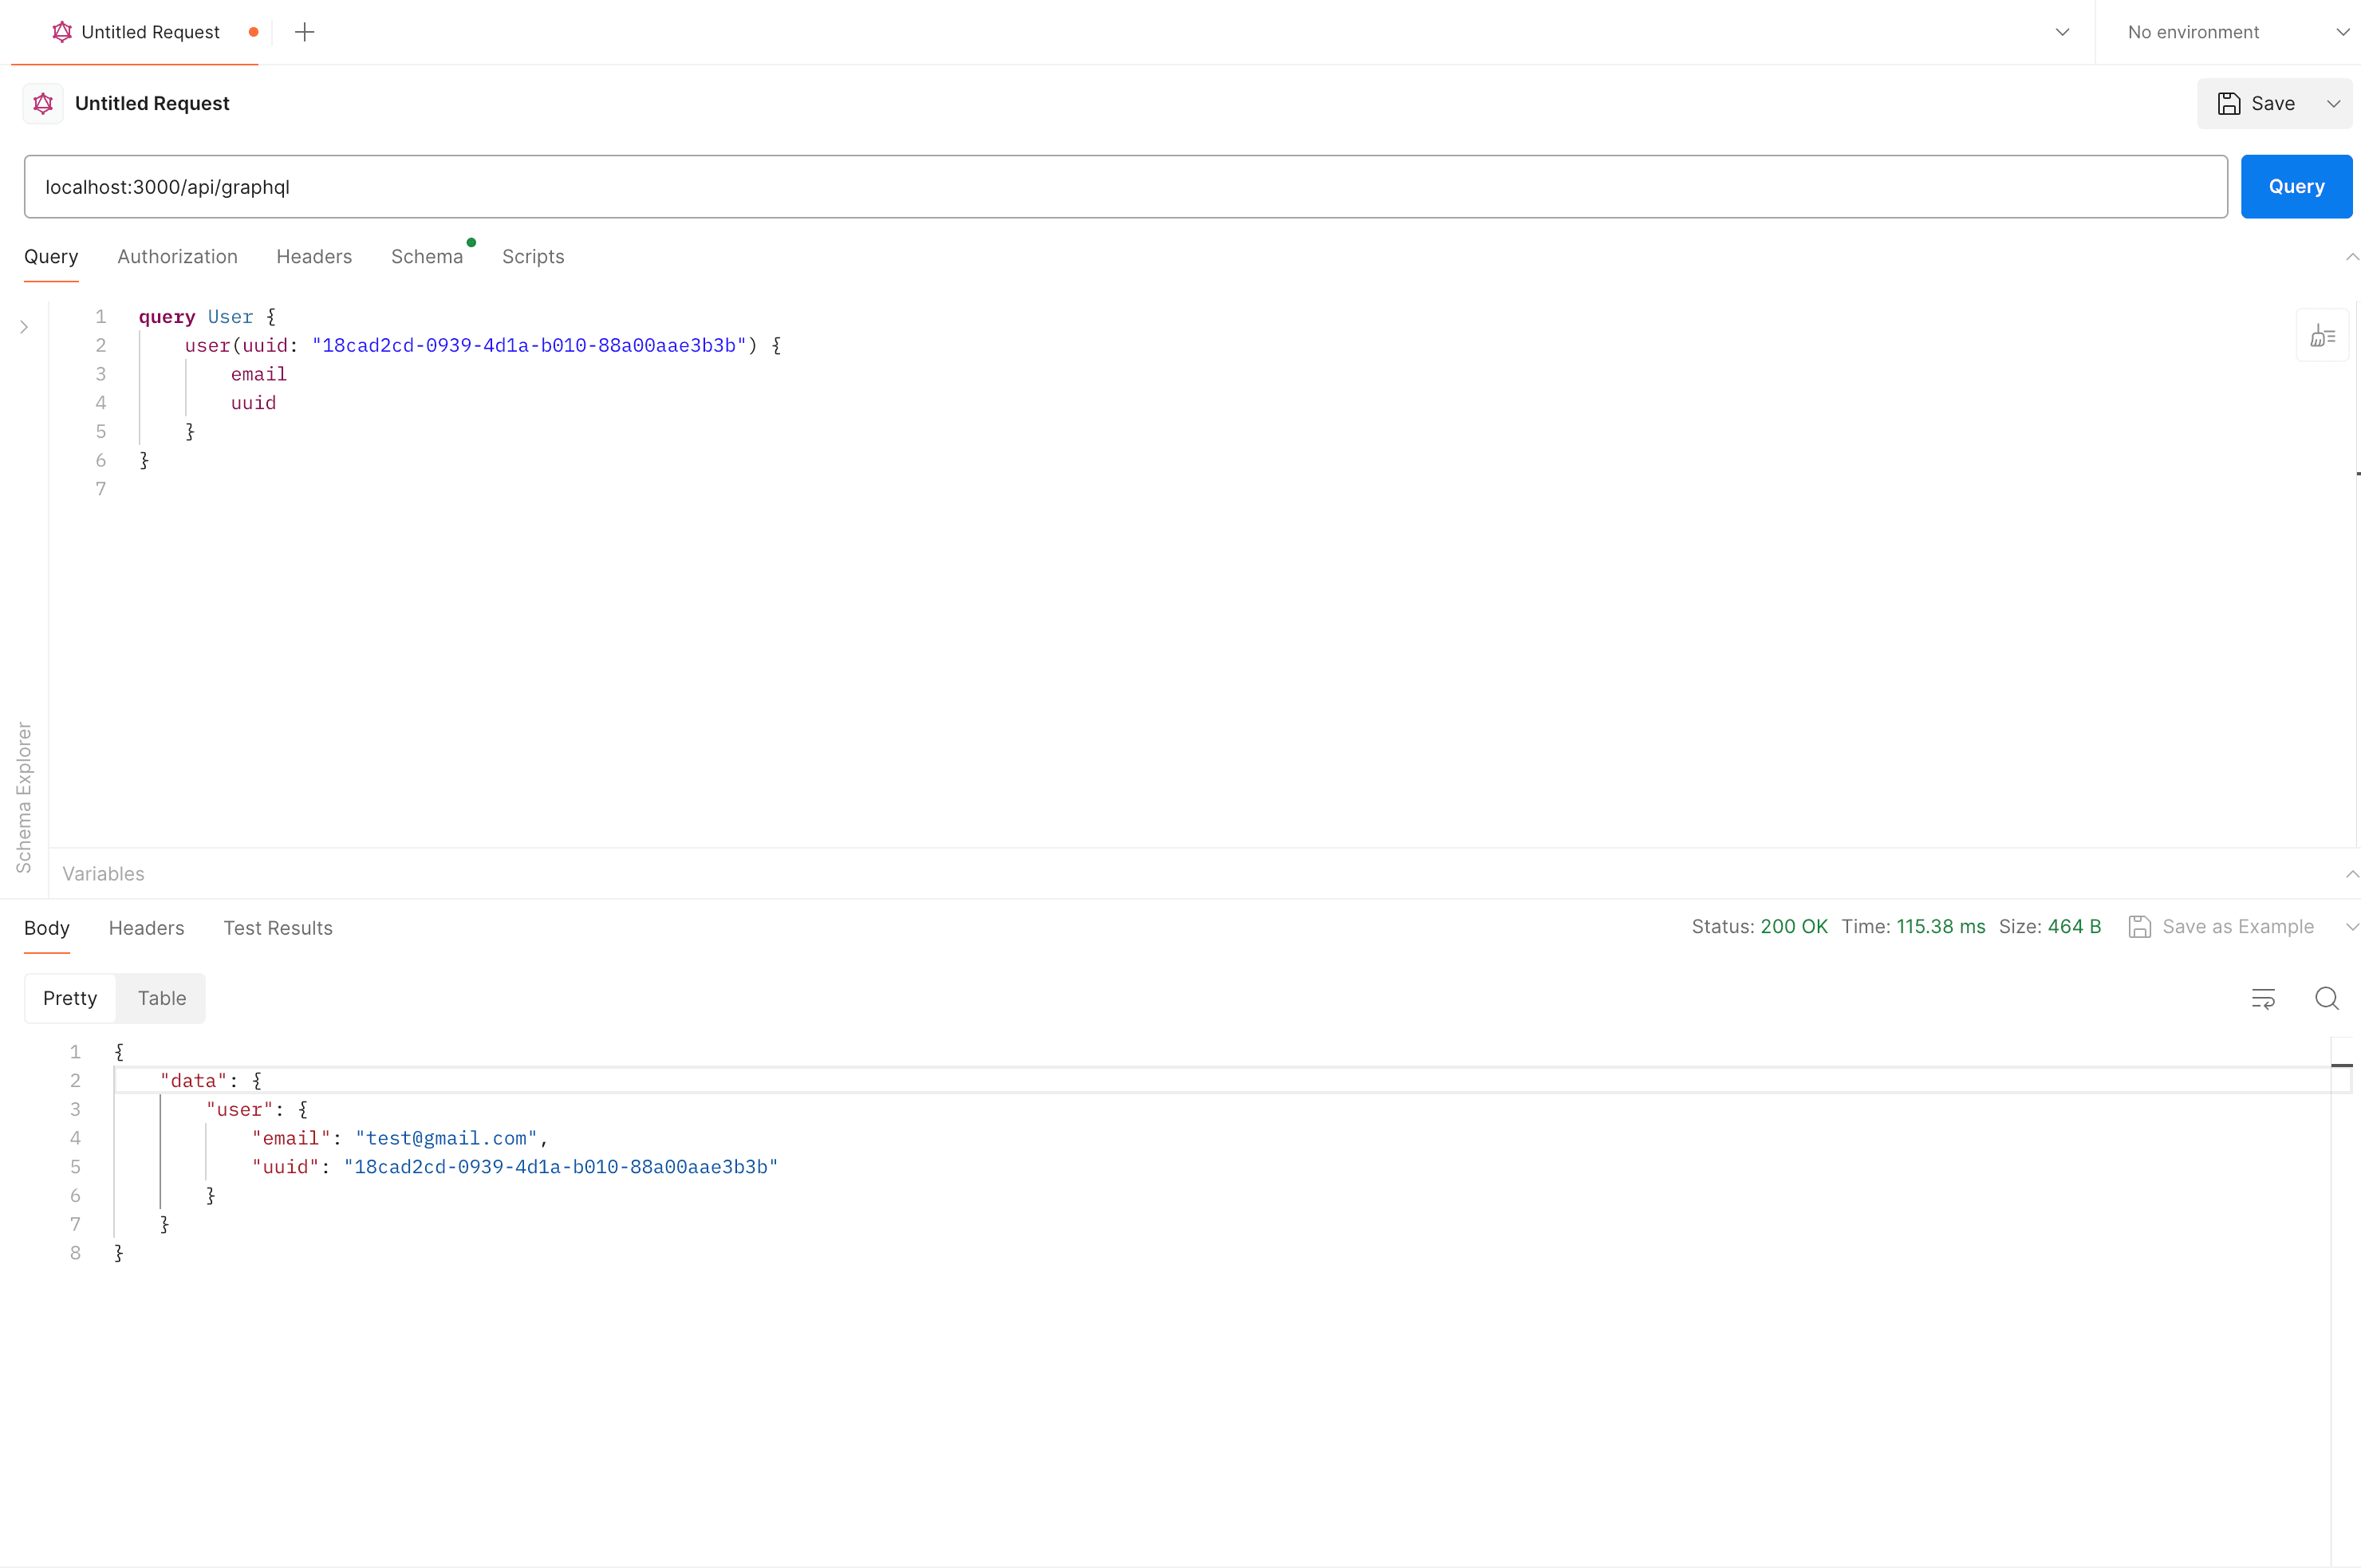
Now that you have a user record in users database table. You can now fetch the user's data by their uuid by calling the user query.
query User {
    user(uuid: "18cad2cd-0939-4d1a-b010-88a00aae3b3b") {
        email
        uuid
    }
}
output:
{
    "data": {
        "user": {
            "email": "test@gmail.com",
            "uuid": "18cad2cd-0939-4d1a-b010-88a00aae3b3b"
        }
    }
}
Summary
GraphQL is a powerful API that allows many startups to innovate quickly. It gave many startups who were early adopters an competitive advantage over ones who were using REST APIs and now many companies have been transitioning to GraphQL as it's a better way to build and maintain APIs. In this blog you setup GraphQL to your Next.js app that allows type-safety checks and is maintainable at scale with the help of Pothos focused on storing user's email address.
